Introduction
As the name suggests, this method allows you to upload media directly into an Archive Item class, while allowing the submitter to provide only a minimal input of metadata for each record.
Simple Upload is suitable for non-administrator Users to submit a small number of media files at a time. It has primarily been developed for organisations who wish to take media submissions from people outside of their organisation. The process is simple and direct; but lacks many of the tools and functionality required by an administrator.
The attribute fields visible in the Simple Upload process can be configured within the attribute’s properties for each Archive Item and View class. Fields can be designated as ‘required’, forcing the submitter to provide information for the submission to process. Furthermore, a User’s submissions can be assigned to a specific Collection within the archive, providing a Collection has been specified in the User’s account properties.
Please contact Keeping Culture support for more information on customising the Simple Upload process.
Uploading Archive Items with Simple Upload
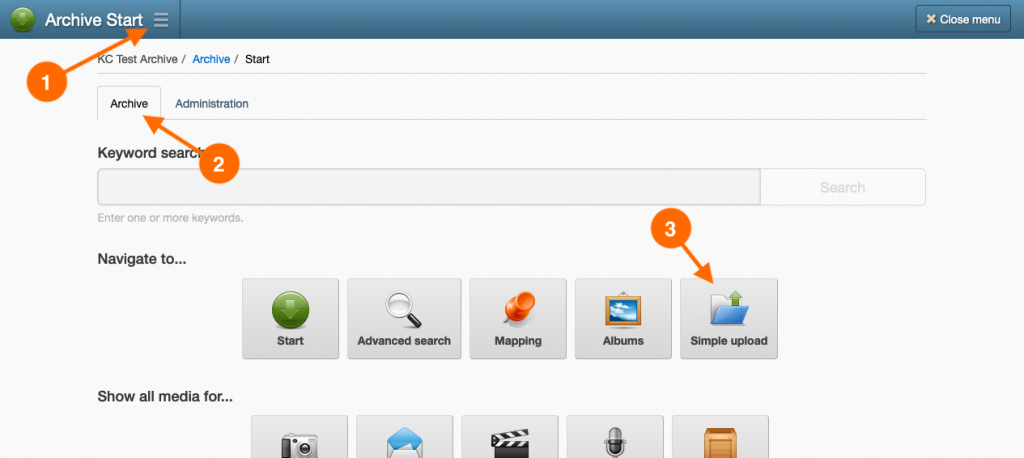
- Navigate to the Simple Upload page by going to: Main Menu → Archive tab → Simple Upload button.

- On the Simple Upload page, click the button of the Archive Item class for the media files you are submitting. The Simple Upload process will only allow you to upload media files into one Archive Item class at a time. You will need to repeat this process if you have media for other Archive Items.
- Add your files to the list of items to import. This can be done by either clicking File Chooser and selecting the files or drag-and-drop the files on the browser window. Your files should appear in the list.
- Once you are satisfied with your selection, click Begin uploading….
- Once a file has finished uploading, you can start adding metadata to the item.
Click Edit fields and enter any requested information into the fields provided. Click Apply & close editor. If you have applied metadata to all required fields, you should now see a green tick next to the filename. Repeat this step with the other uploaded files. - Other considerations…
- If your User account Permissions allow you to apply restrictions, then the Restriction editor will be available. Click Restrict record and apply any viewing restrictions for your uploaded files. Click Apply & close editor.
- You can reorder the files using the up and down arrow buttons. Archive numbers will be assigned to the files from top to bottom. It is a good idea to order them into chronological order when the files are part of a series or event.
- You can make a file a View (page/track/clip) of the file above by clicking Make View. Equally, you can return a View back to an Item by clicking Make Item.
- Once all your files have finished uploading, and you have applied values to the required fields, the Confirm uploads… button will be enabled. Click Confirm uploads…
- Your files will be confirmed into the archive; a progress bar will show you how the confirmation is proceeding. Once complete, your files will be displayed in the Search Results page.
