Ingestion process workflow
The Ingest media process has been carefully thought out to ensure administrators can add metadata, apply content restrictions, and perform quality control checks before making these new records visible in the archive.
The workflow of the ingestion process is as follows:
- Prior to ingesting media, you would have assembled your files together into some sort of logical or meaningful groups, perhaps into folders, ready for ingesting.
- (Optional) You upload the files (and folders) using FileZilla to the archive’s FTP folder. This is the recommended approach as uploading with FileZilla is more reliable than from the browser. You can upload hundreds of files at a time, and if there is an issue with the ingestion process, you won’t need to upload the files again.
- Within the archive, you follow the steps through the Ingest media wizard to bring the media into the archive. The wizard generates the Archive Item records structure needed for the media; however, the records are not assigned an archive number yet. These records are called ‘unconfirmed’ and are held externally from the main collection. They won’t be published in any archive searches until they are confirmed into the archive.
- The unconfirmed records are presented to you in the Search Results page. You can apply metadata to the records using the batch edit process or view and edit the record on the View page.
- Once you have finished editing the records, you then confirm them into the archive where they receive their archive numbers. Otherwise, you can delete unconfirmed records if they are not suitable.
- If you have uploaded the files to the archive’s FTP folder, then it is now safe to remove these files. The archive does not refer to these files once they are ingested.
Assigning Archive Views by file names
How your media files are named can tell the system about the View (pages/tracks/clips) relationships your files have with each other. Using a sequential numbering system starting from one, you can append a dash followed by a three-digit number before the file extension of your files; like ‘-001’, ‘-002’, ‘-003’, etc. This tells the archive that the file might be part of a multi-page document, multi-tracks sound, multi-clip movie or multi-viewpoint object.
Take a three-page document as an example. Each page is scanned to make three separate TIFF image files. If the title of the document is ‘letterToMinisterSmith’, then the three TIFF files are named with the title, followed by the dash and three-digit number, then the file extension.
Like so:
- letterToMinisterSmith-001.tif
- letterToMinisterSmith-002.tif
- letterToMinisterSmith-003.tif
During the file selection process, the file names are evaluated to find files that have a common title –the text before the last dash of the file name – and have a sequential three-digit number sequence starting from one. If these conditions are met, the files are seen to be an Archive Item with multiple Views.
Ingesting media to create unconfirmed records
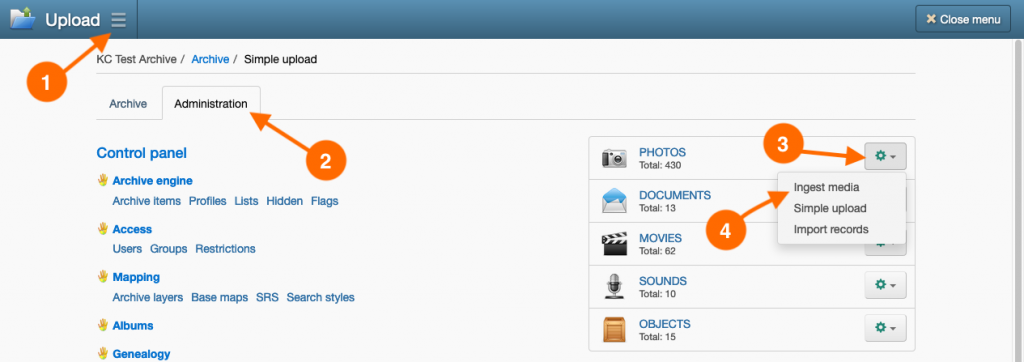
- To access the Ingest media wizard, go to the Main Menu → Administration tab, then in the ‘cog’ button menu next to the Archive Item type for your media, select Ingest media.

- With the Media tab selected in the wizard, click Choose files.
- In the Choose files window, do one of the following:
- If the files have been uploaded to the archive’s FTP folder, select the Archive files tab, navigate to, and select the media files to ingest. Click Select.
- Select the Upload files tab, choose your media files to ingest or drag-and-drop them onto the browser window. Once the files appear in the Files to upload list, click Upload.
- Your selected files will appear in the ‘Media’ list. Use the up and down arrow buttons to reorder the files. Use the right arrow button to make the file a View (page/track/clip) of the file above or use the left arrow button to make the file an Item.
- (Optional) Select the Item fields tab. In the fields provided, enter any common Archive Item metadata that will be applied to all new Item records created during ingestion.
- (Optional) Select the View fields tab. In the fields provided, enter any common Archive View metadata that will be applied to all new View records created during ingestion.
- (Optional) Select the Restrictions tab. Enter any common Content Restriction that will be applied to all new Archive Item record.
- Once you are satisfied with your file selection and metadata settings, click Continue.
- Review your metadata and restrictions settings from the previous step. Click Continue if you are happy to proceed with the ingestion.
- The media will begin ingesting; a progress bar will inform you of how the importation is proceeding.
- Once completed, the wizard will show you the outcome of the process. Click View unconfirmed records.
- Your ingested media will now be available as unconfirmed records in the Search Results page. Here you can batch edit or view and edit the records in the View page.
- Finally, you will need to either confirm the records into the archive (see Confirming unconfirmed records) or delete them if they are no longer needed (see Deleting unconfirmed records).
Confirming unconfirmed records
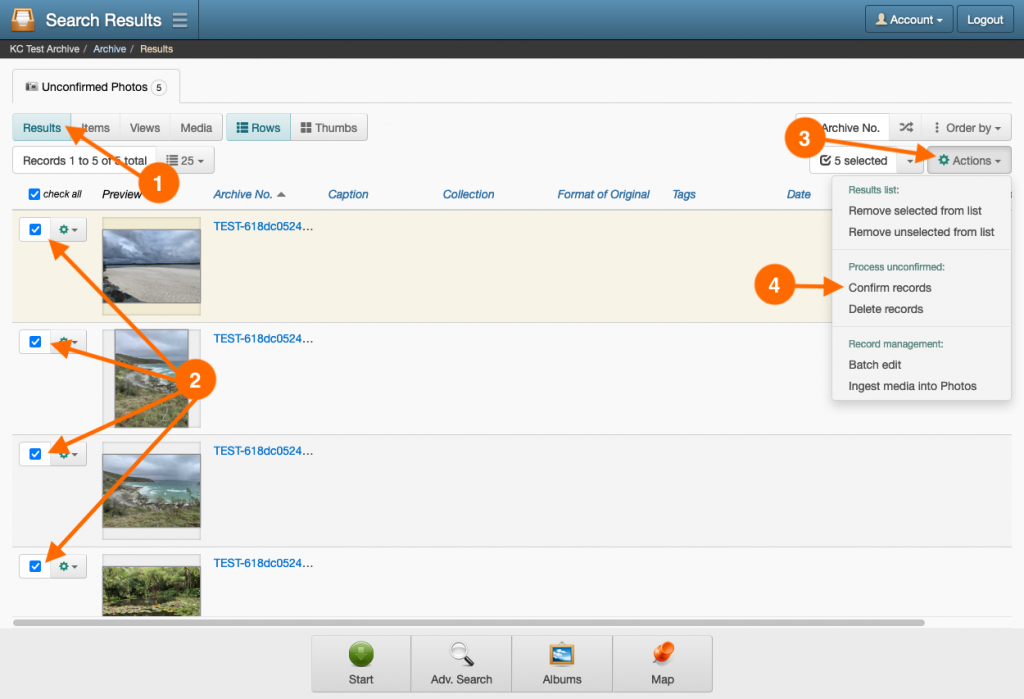
- Navigate to the Search Results page containing your unconfirmed records. See Accessing unconfirmed records if they are not displayed.
- Ensure that either the Results or Items button is enabled in the top-left of the page.
- Depending on how many records you’re confirming, do one of the following:
- To confirm a single record, select Confirm record from the ‘cog’ button menu next to the record you’re confirming.
- To confirm multiple records, enable the checkboxes of the records you are confirming, then select Confirm records from the Actions button menu.

- On the Confirm record(s) page, click Confirm records.
Deleting unconfirmed records
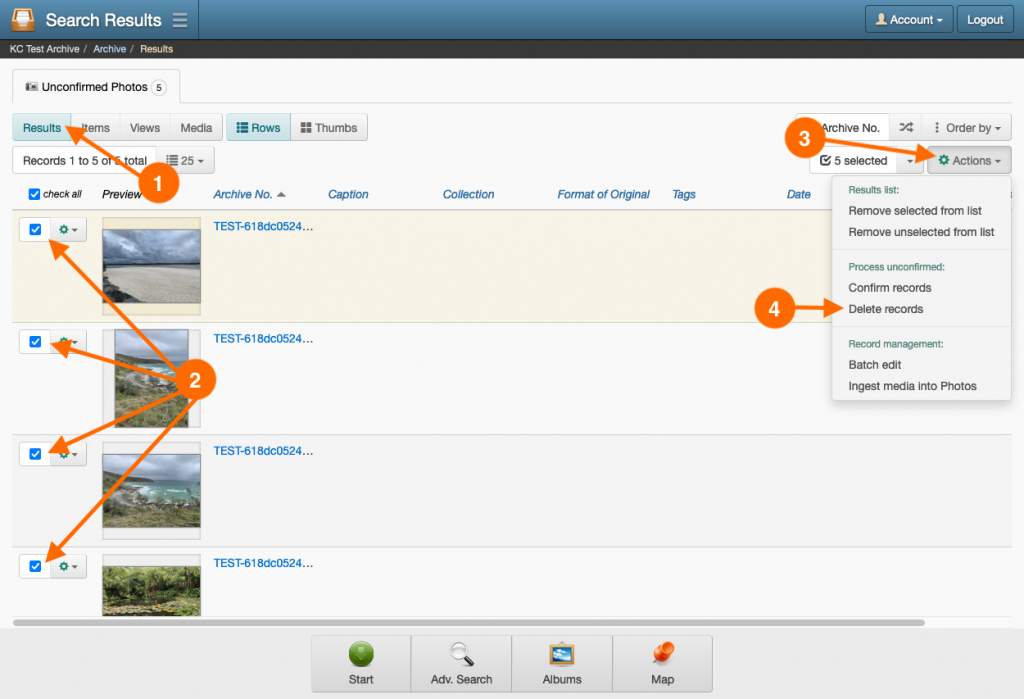
- Navigate to the Search Results page containing your unconfirmed records. See Accessing unconfirmed records if they are not displayed.
- Ensure that either the Results or Items button is enabled in the top-left of the page.
- Depending on how many records you’re deleting, do one of the following:
- To delete a single record, select Delete record from the ‘cog’ button menu next to the record you’re deleting.
- To delete multiple records, enable the checkboxes of the records you are deleting, then select Delete records from the Actions button menu.

- On the Delete unconfirmed record(s) page, click Delete unconfirmed.
Accessing unconfirmed records
Unconfirmed records will remain in the archive until they are confirmed or deleted. They can be retrieved at any time by following the steps below. However, the options to view unconfirmed records will only be present if unconfirmed records exist in the Archive Item class.
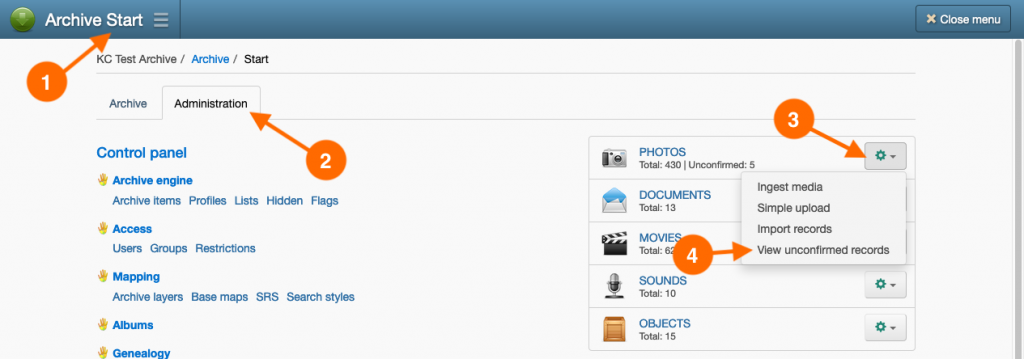
- Open the Administration menu by going to: Main Menu → Administration tab. On the right-hand side of the menu, you will see the Archive Items classes listed. Next to the title of the class it will display how many unconfirmed records are in the class.
- Inside the ‘cog’ button menu to the right of the class title containing unconfirmed records, select View unconfirmed records.

