Introduction
Media and associated metadata are imported from Comma Separated Value (CSV) formatted text files and a folder containing the media. The CSV format is supported by most Spreadsheet software, like Microsoft Excel.
To prepare a CSV file, you will want to create a spreadsheet where the column headings relate to the attributes (fields) of the Archive Items class you are importing into. An extra column is added that contains a relative file path to the media file; this is the location of the media file relative to the CSV file, see the example below.
You then populate the rows of the spreadsheet with the metadata for the records along with the media file path. The spreadsheet is then saved as a .csv file and uploaded to the archive’s FTP folder along with the folder containing the media.
Import file and folder structure example
Take a moment to look at this simple file and folder structure.

There is the ‘ImportPhotos.csv’ file containing the metadata for the import. There is a folder called ‘media’ that is in the same directory as the ‘ImportPhotos.csv’ file. Inside the ‘media’ folder is a subfolder called ‘photos’, that contains three JPEG images.
From the location of the ‘ImportPhotos.csv’ file, the relative file paths to the three media files are as follows:
- media/photos/FieldTrip20170322.jpg
- media/photos/IMG9347.jpg
- media/photos/TIF03dFES.jpg
Note that a forward slash ( / ) is used to denote directory separation in the file path. Do not use a back slash.
To import an Archive Item with multiple Views (pages/tracks/clips/viewpoints), your spreadsheet will need to contain a column with a common value that groups rows as being part of one Archive Item. Normally you can use an existing column, like Document Title, to differentiate Archive Items.
When the import occurs, the current row’s column value is compared with the value in the previous row. If the values are identical, then the row’s media and metadata is added as a View record of the previous Archive Item. When adding additional Views to the spreadsheet, these rows must be directly beneath the first row and in their page/track/clip/viewpoint order.
You cannot mix records and media of different Archive Items classes in your spreadsheet.
The import process does have some limitations. Data types, such as dates and spatial information, will need to be in a format that is recognised by the archive. Consequently, it is recommended that you contact Keeping Culture support to discuss the appropriate formats and methods to import your data.
Like the Ingest media method, the import will be brought into the archive as an unconfirmed record. You will then need to confirm these items into the archive once you’re satisfied the import was a success.
Finally, be aware that importing is an additive process; it does not update existing records with extra information. Instead, a new record is created for every row of the spreadsheet; regardless of whether a duplicate record already exists in the archive. If you do get duplicates, then you should remove the duplicate that you just imported.
To import media
Before you begin, you will need to upload the CSV import file and media to the archive’s FTP folder prior to importing the records.
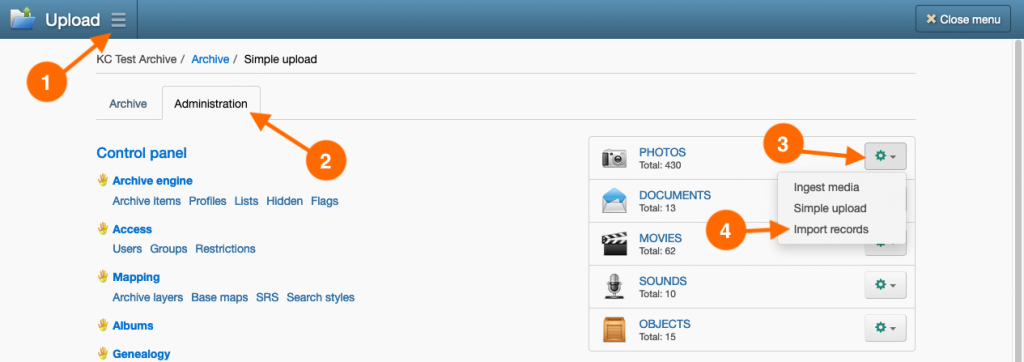
- To access the Import wizard, go to the Main Menu → Administration tab, then in the ‘cog’ button menu next to the Archive Item class for your imported media, select Import records.

- In the wizard, click Choose file.
- In the Choose file window, navigate to, and select, the CSV file that you’ve previously uploaded to the archive’s FTP folder. Click Save.
- Select ‘CSV & TAB File Importer’ from the Format list. Click Continue.
- Click Continue again.
- In the Identifier column dropdown list, select the column to use for the differentiated Archive Items. Leave it as the default value if your import does contain multiple Views.
- In the Media file path column dropdown list, select the column that contains the relative file path to the media file.
- Systematically work through the list of Archive Item and Archive View class attributes (fields) assigning a column that contains the value for the attributes. It is not necessary to assign a column to every attribute.
For attributes that accept multiple values, the column’s value can be separated into multiple values using a delimiter, usually a comma. For example, a column value of ‘Matt Smith, Jill Green, Ken Bell’ can be broken into three separate people using a comma ‘,’ delimiter.
For attributes that reference their values from multiple classes, you must specify the class that the column’s value will be imported into.
Once you have finished making your column assignments, click Continue. - In step four of the wizard, specify any content restriction that will be applied to the imported records. Click Continue.
- The import will begin, and once complete, the wizard will display the outcome of the process. Any errors and skipped records will be reported to you. Click View unconfirmed records.
- Your imported media will now be available as unconfirmed records in the Search Results page. Here you can batch edit or view and edit the records in the View page.
- Finally, you will need to either confirm the records into the archive (see Confirming unconfirmed records) or delete them if they are no longer needed (see Deleting unconfirmed records).
