
Access Tags are labels used to classify the archive’s Groups, Restrictions and User accounts, so that you can organise and filter them by your community’s own cultural or organisational structure. It is recommended that you read About Access Tags before making changes to the archive’s Access Tags.
The Access Tags page lets you:
- view every Access Tag in the archive, with the number of Groups, Restrictions and User accounts that carry it
- add, rename and remove Access Tags (Super Administrator only).
Tags are applied to Groups, Restrictions and User accounts from their edit pages, and the Groups, Restrictions and Users pages can be filtered by tag. Both tasks are described below.
Note: the Administration tab has two Tags hyperlinks. The one under the Curate heading is for Card Tags, which are a separate list. See Managing Card Tags.
To view the Access Tags page, navigate to:
- Main Menu
- Administration tab
- Tags hyperlink under the Access heading
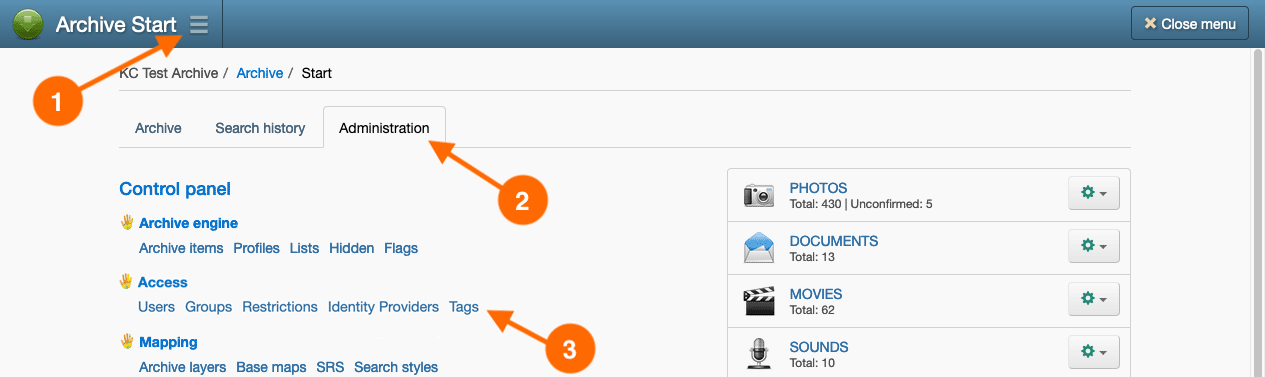
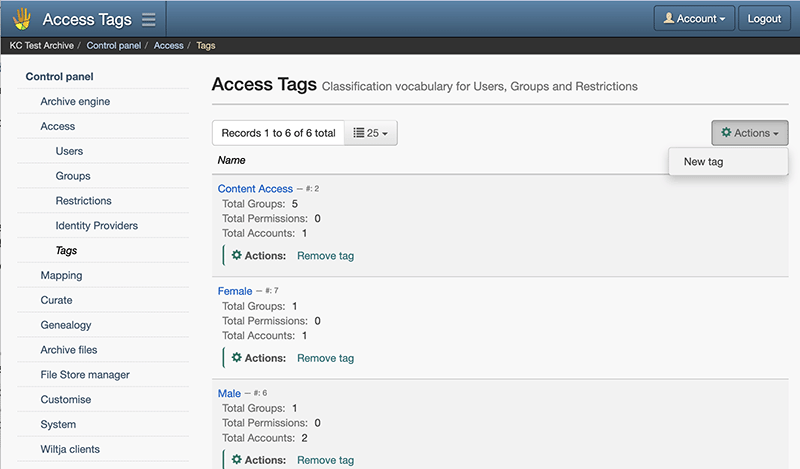
For each tag, the page shows Total Groups, Total Permissions and Total Accounts. Total Permissions is the number of Restrictions that carry the tag.
You must log in as a Super Administrator on the archive’s Master archive to add, rename or remove Access Tags. Other administrators can view the list, and the page displays a banner explaining that only a Super Administrator can change tags. On a Portal archive, the list can only be changed on the Master archive.
If the hyperlinks, pages and resources for managing Access Tags are not available on the archive, try logging in with an account with higher administrative privileges or as a Super Administrator.
Adding an Access Tag
You must log in as a Super Administrator on the Master archive to add Access Tags.
- Navigate to the Access Tags page, by going to: Main Menu → Administration tab → Tags hyperlink under the Access heading.
- In the Actions button menu, select New tag.
- Enter a Name for the tag. Click Save.
Note: tag names must be unique. Names are not case sensitive, so ‘staff’ and ‘Staff’ are treated as the same name.
Renaming an Access Tag
You must log in as a Super Administrator on the Master archive to rename Access Tags.
- Navigate to the Access Tags page, by going to: Main Menu → Administration tab → Tags hyperlink under the Access heading.
- In the list of tags, select the name of the tag you wish to rename.
- On the Edit tag page, change the Name. Click Save.
Removing an Access Tag
You must log in as a Super Administrator on the Master archive to remove Access Tags.
- Navigate to the Access Tags page, by going to: Main Menu → Administration tab → Tags hyperlink under the Access heading.
- In the list of tags, select the Remove tag hyperlink in the row of the tag you wish to remove.
- On the Remove tag page, check the message showing how many Groups, Restrictions and User accounts carry the tag. Removing the tag takes it off all of them. The Groups, Restrictions and User accounts themselves are not affected. Click Remove, or click Cancel to go back.
Tagging a Group, Restriction or User account
You can apply any number of Access Tags to a Group, Restriction or User account, or leave it untagged. Your User account needs the same permissions that you need to edit the record; no additional permission is required:
- Navigate to the Groups, Restrictions or Users page, by going to: Main Menu → Administration tab → Groups, Restrictions or Users hyperlink.
- Select the name of the Group, Restriction or User account to edit. To tag a new record, create the record as described in Groups, Restrictions (Permissions) or User accounts.
- In the Tags field, start typing the name of a tag, or select a tag from the list. To remove a tag, click the ✕ on the tag.
- Save your changes.
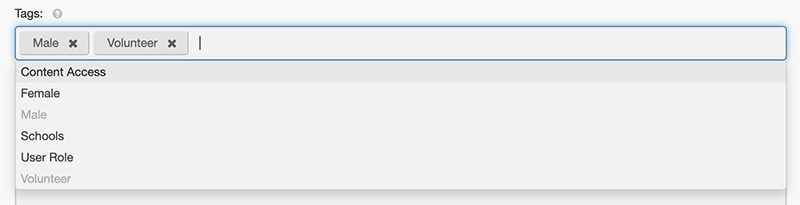
Note: the Tags field is only displayed when the archive has at least one Access Tag.
Note: the Tags field lists every Access Tag, including tags you only use on one kind of record.
Note: when you create a Restriction, the archive also creates a Group for it. The two records have separate Tags fields. See Creating a custom restriction.
To tag many User accounts at once, see Batch editing user accounts.
Filtering the Groups, Restrictions and Users lists by tag
The tags on each Group, Restriction and User account are displayed under a Tags line in its row. You can filter each list by tag to see the records that belong to a part of your community or organisation.
Your User account needs the permissions required to view the page: Administer Groups, Administer Permissions/Restrictions or Administer User accounts, together with Administration access.
- Navigate to the Groups, Restrictions or Users page, by going to: Main Menu → Administration tab → Groups, Restrictions or Users hyperlink.
- In the filter area, open the Tag dropdown and choose an option:
– ‘Any’: no tag filtering. This is the default.
– ‘Untagged’: only records with no tags.
– A tag name: only records that carry that tag. - (Groups only) To search by name or description, type in the Keyword box. The keyword and tag filters work together, so a Group must match both.
- Click Filter. To remove all filters, click Clear.
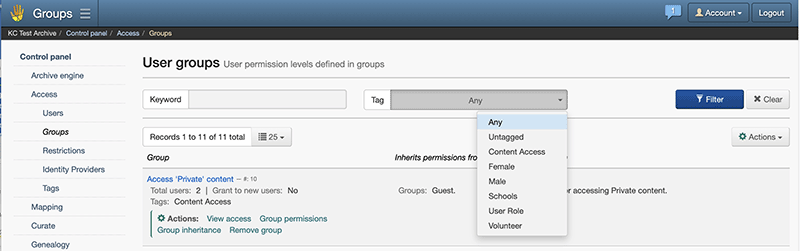
The filter stays in place as you move between pages of results. If no records match, the page explains why; click Clear to show all records again.
Note: the Tag dropdown only lists tags that are applied to at least one record of that kind. A tag that is used only on Restrictions does not appear in the Groups or Users filter, and a tag used only on User accounts does not appear in the Groups or Restrictions filter.