
Introduction
A User account’s properties are separated into four distinct sections:
- User details: the User’s name, email, username and password.
- Group membership: the Groups that the User account will be a member of.
- Restriction defaults: set default preferences to either ‘Show’ or ‘Hide’ specific content restrictions. These settings are applied to the login session each time the account is used to access the archive.
- Record associations: associate the User with a Person record and/or Collection record within the archive. The Person record is automatically inserted as a Contributor when the User creates an annotation and the Collection record is assigned to media submitted through the Simple Upload process.
To stop Users from having easily guessed passwords for their accounts, a password strength meter is used to enforce a minimum password strength. You can adjust the strength requirement for a password on the archive’s Preferences page. See Password strength and age limits.
The system’s Change Log documents the changes and interaction of a User while they are logged into the archive. The User’s account is referenced in these log entries and removing an account will destroy these important references in the log. Consequently, active accounts with Change Log entries are retired instead of removed. Administrators can view the Change Log entries of a retired account; however, the account can no longer be used to log into the archive.
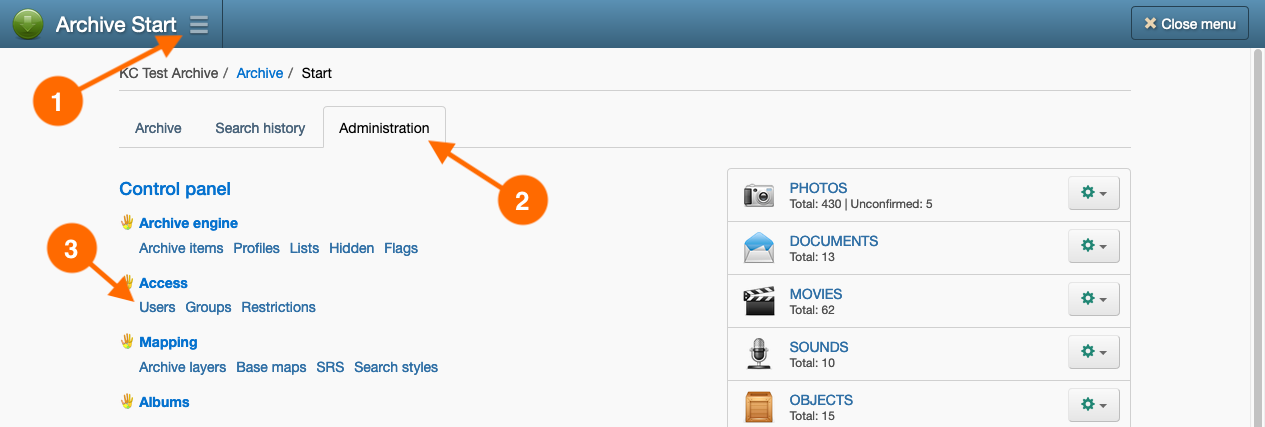
To view the Users page, navigate to:
- Main Menu
- Administration tab
- Users hyperlink
Note: it is good practice to create User accounts while logged into the archive as a Super Administrator, that way all Groups will be visible when assigning group membership. Otherwise, the system will only show Groups that are available to the account you are currently using to access the archive.
Creating a user account
- Navigate to the User accounts page, by going to: Main Menu → Administration tab → Users hyperlink.
- In the Actions button menu, select New user.
- In the New user account wizard, enter a Full name, Username and Password for the account. Optionally, you can also provide a Preferred name and Email address.
Click Continue. - In step two of the wizard, you will assign Group membership to the account. Enable the checkboxes of the Groups to which the User will have membership. By default, the User will be granted Registered User Group. Click Continue.
- Step three of the wizard is optional; here you assign People and Collection records to the account. It’s generally a good idea to provide a Person reference if the account is going to be used by an individual. Occasionally an account might be set up for a group of people, in which case, assigning a Person reference may not be a good idea. Click Continue.
- The User account is created. Click Done.
Suspending a user account
A suspended account cannot be used to access the archive; it is deactivated.
- Navigate to the User accounts page, by going to: Main Menu → Administration tab → Users hyperlink.
- In the list of User accounts, select the Suspend user hyperlink beneath the name of the account you wish to suspend.
- On the Suspend account page, Click Suspend.
Approving a user account
If an account has been suspended, it can be approved to make it active again.
- Navigate to the User accounts page, by going to: Main Menu → Administration tab → Users hyperlink.
- In the list of User accounts, select the Approve user hyperlink beneath the name of the account you wish to activate.
- On the Approve account page, select Approve.
Editing a user account
- Navigate to the User accounts page, by going to: Main Menu → Administration tab → Users hyperlink.
- In the list of Users, select the name of the account you wish to edit.
- Make your changes to the account, then click Save & Close.
Removing or retiring a user account
Active user accounts are retired rather than removed. This preserves valuable Change Log information that is linked to retired accounts.
A retired account cannot be used to login to the archive. It is not displayed in the administrative list of user accounts either. Instead, retired accounts are listed in a separate page where Super Administrators can view the Change Log for these retired accounts.
Inactive accounts, those that have never been used to access the archive, can still be removed. These accounts don’t have Change Log entries and are safe to permanently delete.
The archive will display the appropriate action – to retire or remove – for each account.
Please consider whether removing or retiring an account is the appropriate action. Alternatively, an account can be suspended to prevent it from being used to log into the archive.
Remove/retire a single account
- Navigate to the User accounts page, by going to: Main Menu → Administration tab → Users hyperlink.
- In the list of User accounts, select the Remove/Remove user hyperlink beneath the name of the account you wish to remove.
- On the Remove/Retire account page, click Remove/Retire.
Batch remove/retire multiple accounts
- Navigate to the User accounts page, by going to: Main Menu → Administration tab → Users hyperlink.
- In the list of User accounts, enable the checkboxes of the accounts you wish to retire and/or remove.
- In the Actions button menu, select Retire/remove users.
- On the Retire/remove users page, review the list of accounts that will be retired or removed. Click Proceed if you wish to remove/retire your account selection.
Viewing retired user accounts
Retired user accounts are listed in a sub-page of the User accounts page. The Change Log entries for retired user accounts can be accessed from this page.
- Navigate to the User accounts page, by going to: Main Menu → Administration tab → Users hyperlink.
- In the administration page menu, on the left hand-side of the page, click the Retired hyperlink directly beneath the Users menu item.
Batch editing user accounts
The batch edit accounts wizard allows you to change the following properties on multiple accounts:
- Suspend or Approve accounts.
- Change Usage Type and Authentication Method for accounts.
- Add or remove group membership to and from accounts.
- Add and remove Collection associations to and from accounts.
- Navigate to the User accounts page, by going to: Main Menu → Administration tab → Users hyperlink.
- In the list of User accounts, enable two or more checkboxes of accounts that you wish to batch edit.
- In the Actions button menu, select Batch edit users.
- In the Batch edit users wizard, the batch operations available to your user account will be listed on the page. Choose the appropriate Batch action for each of the operations.
Click Continue. - In Step 2 of the wizard, review your batch action choices and account selection. Click Back if you need to change your preferences, otherwise click Continue to proceed with the batch edit.
- The batch edit will proceed and complete. Click Done.
Merging user accounts
Multiple user accounts can be merged into one account. The Change Log entries linked to the merged accounts are updated to reference the retained account once the merge is complete. In situations where a person has created multiple user accounts for themselves, consolidating them into one account is a sensible choice.
What’s more, accounts created through Identity Providers have External only authentication methods, and don’t have an internal username and password. At some point, you may want to merge an External account with an Internal account to create one account that has both internal and external authentication methods.
- Navigate to the User accounts page, by going to: Main Menu → Administration tab → Users hyperlink.
- In the list of User accounts, enable two or more checkboxes of accounts that you wish to batch edit.
- In the Actions button menu, select Batch edit users.
- In the Batch edit users wizard, the batch operations available to your user account will be listed on the page. Choose the appropriate Batch action for each of the operations.
Click Continue. - In Step 2 of the wizard, review your batch action choices and account selection. Click Back if you need to change your preferences, otherwise click Continue to proceed with the batch edit.
- The batch edit will proceed and complete. Click Done.
Accessing user account settings
A User who may not have administrative access can view and edit their Account settings from within the Account button menu in the top menu bar. Here the User can change their Full name, Preferred name, Email address, Username and Password.
Note: Shared accounts cannot be modified within the Account settings page. Furthermore, the Username and Password fields may not be available to External accounts or when external login authentication has been used.