
Download and install Cyberduck
- Visit the official Cyberduck website for the freeware version: https://cyberduck.io/download/
- Download the installer for Mac or Windows.
- Launch the installer and follow the on-screen instructions to install the application.
Note: The paid version of Cyberduck is available on the App Store for Mac or Microsoft Store on Windows.
Configuring Cyberduck to connect to the archive
To complete these instructions, you will need the archive S3 connection details displayed in the Archive Files settings tab on the archive’s Preferences page.
- Launch Cyberduck.
- At the bottom of the main window, click the ‘+’ button to create a bookmarked connection.
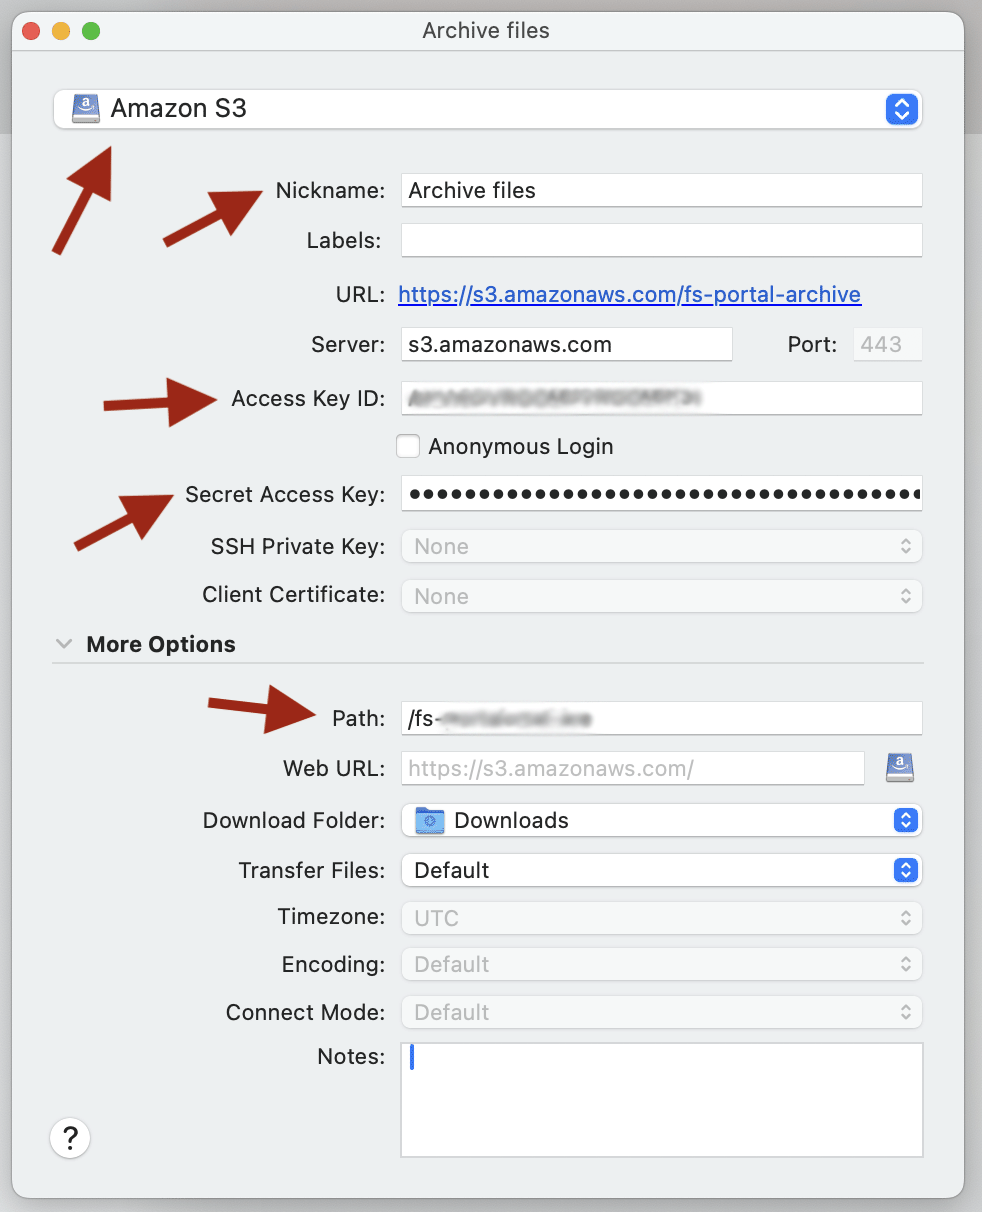
- In the connection properties window, make the following changes:
- Make the connection type: Amazon S3
- Give the connection a Nickname, like: ‘Archive files’
- Copy and paste the Access Key ID value from the archive’s Preferences page to the Access Key ID field.
- Copy and paste the Secret Access Key value from the Preferences page to the Secret Access Key field.
- Close the connections window.
- Your bookmarked connection to the archive should be displayed in the main window. Double click to open the connection and view the files.
Note: on Mac you may be prompted to provide the Secret Access Key again on the first attempt at opening the new connection.
Optional Cyberduck customisation
The toolbar in the main window doesn’t show options to the main tasking you’ll be carrying out in Cyberduck. Those tasks are uploading files, downloading files, creating new folders and deleting file/folders.
Follow the instructions below to modify the main window toolbar.
On Windows:
- In the main window, right-click the toolbar to reveal the toolbar options.
- Deselect, by removing the tick, the following options: ‘Open Connection’, ‘Quick Connection’, ‘Info’, ‘Edit’, ‘Open in Web Browser’, ‘Open in Putty’, ‘Transfers’, ‘Log’ and ‘Cryptomator’.
- Select, by applying the tick, the following options: ‘Action’, ‘Refresh’, ‘New Folder’, ‘Delete’, ‘Download’ and ‘Upload’.

On Mac:
- In the main window, right-click (or hold down the control key and click) the toolbar and select the ‘Customize toolbar…’ item in the menu that appears.
- Remove, by dragging out, ‘Edit’, ‘Open Connection’ and the Search field from the toolbar.
- Move, by dragging, the Action option so it sits next to Disconnect.
- Add, by dragging in, the ‘New Folder’, ‘Upload’, ‘Download’ and ‘Delete’ options to the left of ‘Refresh’.

A quick guide to using Cyberduck
Once you’ve connected to the archive’s S3 bucket, navigating the archive file system is straightforward: use the folder hierarchy in the main window to move between folders, the same as you would when browsing files on your computer, and always ensure you’re working in the correct location for the task you’re about to perform.
To upload, simply drag files or folders from your computer into the main window, or use the Upload toolbar option to select files/folders for uploading—they will be transferred to the archive’s file system. Remember to navigate to the desired folder within the file system before uploading.
Files that are in the process of being uploaded won’t appear within the Archive’s file system until the upload has finished.
For downloads, select the files or folders in Cyberduck and drag them out to your desktop or target folder, or use the ‘Download’ toolbar option to download the files to your computer’s Downloads folder.
To create a new folder, click the ‘New Folder’ button in the toolbar and enter a name.
To delete, select the file or folder you wish to remove and click ‘Delete’ in the toolbar or right-click and choose ‘Delete’ from the menu.