
Download and install FileZilla Pro
- Window: Open Microsoft Store and search for ‘FileZilla Pro’. Proceed with the installation.
- Mac: Open App Store and search for ‘FileZilla Pro’. Proceed with the installation.
Note: FileZilla Pro has a 7-day free trial period to assess the software.
Configuring FileZilla Pro to connect to the archive
To complete these instructions, you will need the archive S3 connection details displayed in the Archive Files settings tab on the archive’s Preferences page.
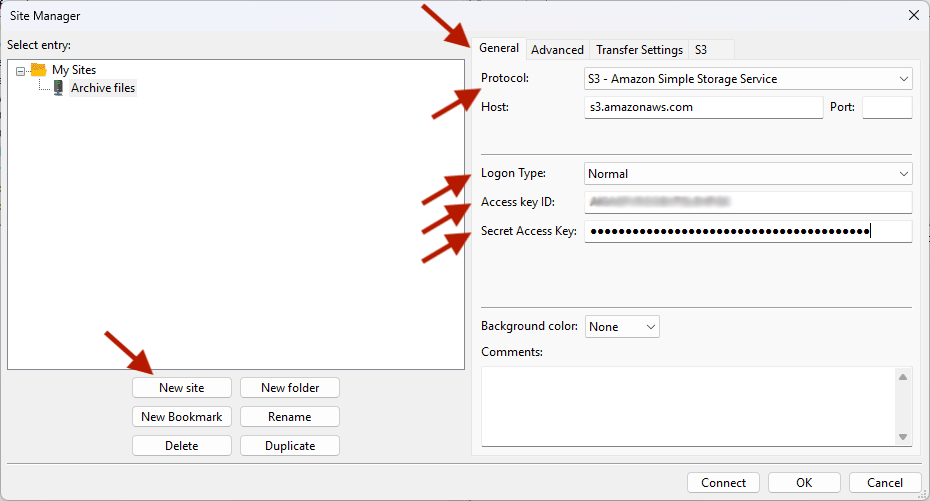
- Launch FileZilla Pro.
- In the File menu, select ‘Site Manager’.
- In the Site Manager window, select ‘New site’ then enter a name, like ‘Archive files’, for the archive.
- On the right-hand side in the General tab, make the following changes:
- Set the Protocol to: S3 – Amazon Simple Storage Service
- Set the Logon Type to: Normal
- Copy and paste the Access Key ID value from the archive’s Preferences page to the Access key ID field.
- Select the Advanced tab, copy and paste the Remote path from the Preferences page to the Default remote directory field.
- Select the S3 tab, in the Initial region fields, enter ‘ap-southeast-2’.
- Click ‘Connect’. On Windows you will be prompted to save the password.
- The first time FileZilla Pro attempts a connection; you will be prompted to trust AWS’ the certificate with common name *.s3-ap-southeast-2.amazonaws.com. Check that the common name is correct. Enable the Always trust this certificate in future session checkbox, then click ‘OK’.
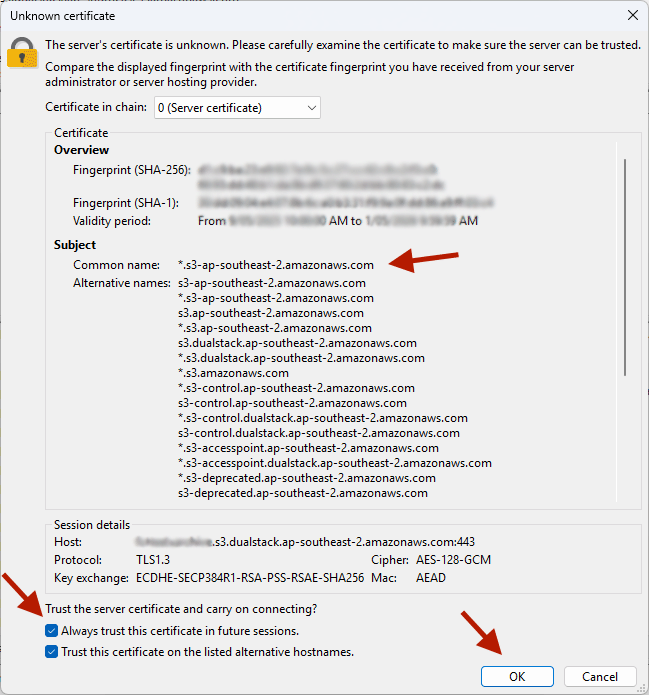
Each time you use FileZilla Pro to access the archive’s file system, you will need to open the Site Manager from the File menu. Select the site you create in step 3 above, then click ‘Connect’.
Configuring FileZilla Pro MIME types and file extensions
When FileZilla Pro uploads files to the archive’s file system, it does not inspect or analyse the contents of those files as other S3 clients do. Instead, it relies on a predefined list of file extension mappings to assign the correct MIME type to each file as part of the HTTP transfer.
If no mapping exists for a given extension, FileZilla Pro will typically fall back to application/octet-stream — a generic binary type that tells the receiving server nothing about the nature of the file.
This matters because the archive needs accurate MIME type information in order to ingest and process files correctly.
In this section, you will need to configure FileZilla Pro with the MIME type mappings of the common files accepted by the archive.
Note: MIME types are assigned at upload time based on file extension. They are not embedded in the file itself, and FileZilla Pro will not detect or correct a mismatch — it is your responsibility to ensure mappings are accurate before uploading.
Common MIME type and file extensions used by the archive
Mappings marked as ‘Recommended’ should be included. Optional mappings can be added if you plan to upload those file types.
Image Types
| MIME Type | Extensions | Notes |
| image/png | png | Recommended, likely already listed in FileZilla Pro. |
| image/jpeg | jpg jpeg jpe | Recommended, likely already listed in FileZilla Pro. |
| image/tiff | tif tiff | Recommended |
| image/jp2 | jp2 j2k jpf jpx jpm | Optional |
| image/gif | gif | Optional |
| image/bmp | bmp dib | Optional |
Audio Types
| MIME Type | Extensions | Notes |
| audio/mpeg | mp3 mp2 mp1 mpga | Recommended |
| audio/mp4 | m4a m4b m4p mp4a | Recommended |
| audio/aiff | aif aiff aifc | Recommended |
| audio/wav | wav | Recommended |
| audio/x-ms-wma | wma | Recommended |
| audio/x-ms-wax | wax | Optional |
| audio/ogg | ogg oga opus | Optional |
| audio/3gpp2 | 3g2 3gp2 | Optional |
Movie Types
| MIME Type | Extensions | Notes |
| video/quicktime | mov qt moov | Recommended for Mac users |
| video/mpeg | mpeg mpg mpe m1v m2v | Recommended |
| video/x-msvideo | avi | Recommended |
| video/mp4 | mp4 m4v mp4v | Recommended |
| video/3gpp | 3gp 3gpp | Optional |
| video/ogg | ogv | Optional |
| video/x-ms-wmv | wmv | Recommended for Windows users |
| video/x-ms-wmx | wmx | Recommended for Windows users |
| video/x-ms-wm | wm | Recommended for Windows users |
| video/x-ms-wvx | wvx | Recommended for Windows users |
| video/x-ms-asf | asf asx | Recommended for Windows users |
Other Data Types
| MIME Type | Extensions | Notes |
| text/csv | csv csj | Recommended |
| text/tab-separated-values | tsv tab | Optional |
| application/xml | xml | Recommended, likely already listed in FileZilla Pro. |
| application/json | json | Optional |
| application/pdf | Recommended, likely already listed in FileZilla Pro. |
Adding MIME type file extension mappings
Be sure to use the MIME type and extension values mentioned above when following the instructions below.
- Launch FileZilla Pro.
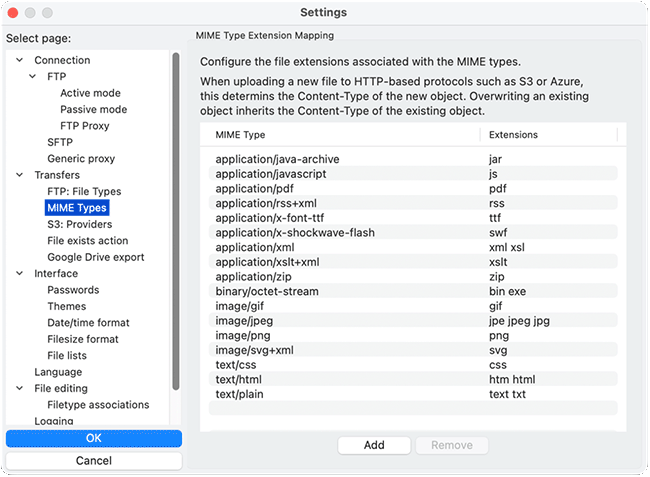
- In the menu bar, select Edit > Settings (Windows) or FileZilla Pro > Settings (Mac).
- In the left-hand panel of the ‘Settings’ window, expand the ‘Transfers’ section and select ‘MIME Types’.
- Click the Add button below the list.
- In the MIME Type field, enter the canonical MIME type string.
- In the Extension field, enter the file extension(s) without a leading dot. For multiple extensions, separate extension names using a single space.
Note: you may need to single mouse click the Extension field, wait a second, to make the field editable. - Repeat this process with the remaining mappings.
- Click OK to save your new entries.
A quick guide to using FileZilla Pro
Once you’ve connected to the archive’s S3 bucket using FileZilla Pro, managing files is intuitive: the interface displays your local site files (your computer’s file system) on the left side and the remote site files (the archive’s file system) on the right.
Navigate the folder hierarchy of either local or remote sites the same as you would when browsing files on your computer and always ensure you’re working in the correct remote site folder before performing any actions.
To upload files or folders, locate them in the local site pane (left side) and drag them across to the desired folder in the remote site pane (right side). Alternatively, right-click your chosen files or folders and select ‘Upload’. Transfers will appear in the queue at the bottom of the window; wait until the status shows completion before disconnecting or navigating away.
Files being uploaded will only appear in the archive’s file system once the upload process is finished.
For downloads, select the files or folders you want to retrieve from the remote site pane, right-click, and choose ‘Download’, or simply drag them to the appropriate folder in your local site pane. By default, downloads will be saved to the local directory currently selected.
To create a new folder in the archive, right-click within the remote site pane, choose ‘Create directory’, then replace the ‘New directory’ text in the file path with your desired folder name.
To delete a file or folder in the archive, select it in the remote site pane, right-click, and select ‘Delete’. Confirm the deletion if prompted.
These steps will ensure you can confidently manage files and folders in the archive using FileZilla Pro.