
Download and install FileZilla Pro
- Window: Open Microsoft Store and search for ‘FileZilla Pro’. Proceed with the installation.
- Mac: Open App Store and search for ‘FileZilla Pro’. Proceed with the installation.
Note: FileZilla Pro has a 7-day free trial period to assess the software.
Configuring FileZilla Pro to connect to the archive
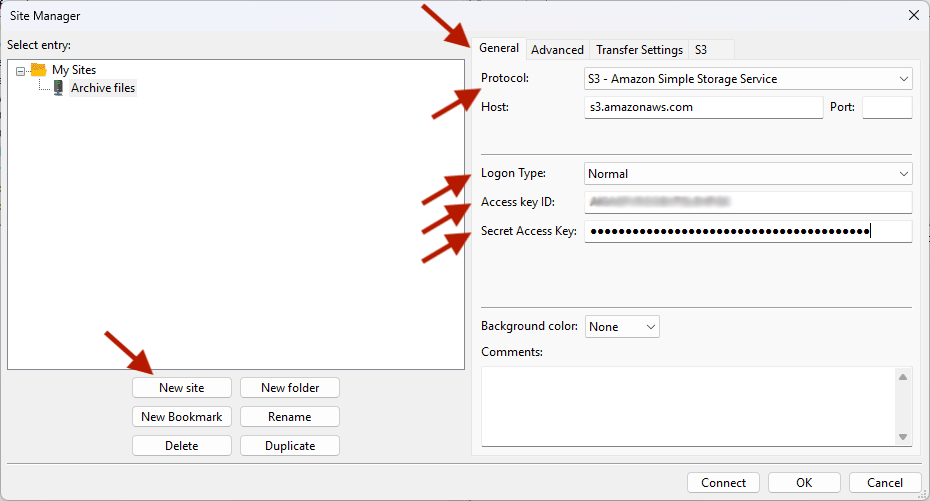
To complete these instructions, you will need the archive S3 connection details displayed in the Archive Files settings tab on the archive’s Preferences page.
- Launch FileZilla Pro.
- In the File menu, select ‘Site Manager’.
- In the Site Manager window, select ‘New site’ then enter a name, like ‘Archive files’, for the archive.
- On the right-hand side in the General tab, make the following changes:
- Set the Protocol to: S3 – Amazon Simple Storage Service
- Set the Logon Type to: Normal
- Copy and paste the Access Key ID value from the archive’s Preferences page to the Access key ID field.
- Select the Advanced tab, copy and paste the Remote path from the Preferences page to the Default remote directory field.
- Select the S3 tab, in the Initial region fields, enter ‘ap-southeast-2’.
- Click ‘Connect’. On Windows you will be prompted to save the password.
- The first time FileZilla Pro attempts a connection; you will be prompted to trust AWS’ the certificate with common name *.s3-ap-southeast-2.amazonaws.com. Check that the common name is correct. Enable the Always trust this certificate in future session checkbox, then click ‘OK’.

Each time you use FileZilla Pro to access the archive’s file system, you will need to open the Site Manager from the File menu. Select the site you create in step 3 above, then click ‘Connect’.
A quick guide to using FileZilla Pro
Once you’ve connected to the archive’s S3 bucket using FileZilla Pro, managing files is intuitive: the interface displays your local site files (your computer’s file system) on the left side and the remote site files (the archive’s file system) on the right.
Navigate the folder hierarchy of either local or remote sites the same as you would when browsing files on your computer and always ensure you’re working in the correct remote site folder before performing any actions.
To upload files or folders, locate them in the local site pane (left side) and drag them across to the desired folder in the remote site pane (right side). Alternatively, right-click your chosen files or folders and select ‘Upload’. Transfers will appear in the queue at the bottom of the window; wait until the status shows completion before disconnecting or navigating away.
Files being uploaded will only appear in the archive’s file system once the upload process is finished.
For downloads, select the files or folders you want to retrieve from the remote site pane, right-click, and choose ‘Download’, or simply drag them to the appropriate folder in your local site pane. By default, downloads will be saved to the local directory currently selected.
To create a new folder in the archive, right-click within the remote site pane, choose ‘Create directory’, then replace the ‘New directory’ text in the file path with your desired folder name.
To delete a file or folder in the archive, select it in the remote site pane, right-click, and select ‘Delete’. Confirm the deletion if prompted.
These steps will ensure you can confidently manage files and folders in the archive using FileZilla Pro.